Ever had something break and thought, “Great, now I need a new one”? Hold up—before you toss it, let me introduce you to one of the most powerful DIY repair hacks out there: superglue and baking soda.
This simple trick turns regular superglue into an instant, rock-hard repair solution that’s stronger than the original material. Whether you’re fixing plastic, wood, or even some metals, this method is a game-changer for DIYers, makers, and even professionals.
Ready to save money and fix things like a pro? Let’s dive in!
Why Superglue & Baking Soda Works Like Magic
Superglue (cyanoacrylate) is already a strong adhesive, but when combined with baking soda (sodium bicarbonate), it creates a chemical reaction that hardens almost instantly.
What Makes This Hack So Powerful?
✔ Dries instantly—no more waiting hours for glue to set.
✔ Forms a rock-solid bond—stronger than the original material.
✔ Fills gaps and cracks—perfect for repairing broken edges.
✔ Works on multiple materials—plastic, wood, ceramics, and even metal.
How to Use Superglue & Baking Soda for Repairs
Step 1: Clean & Prep the Surface
Before applying anything, make sure the surface is clean, dry, and free of dust. If necessary, lightly sand the area for better adhesion.
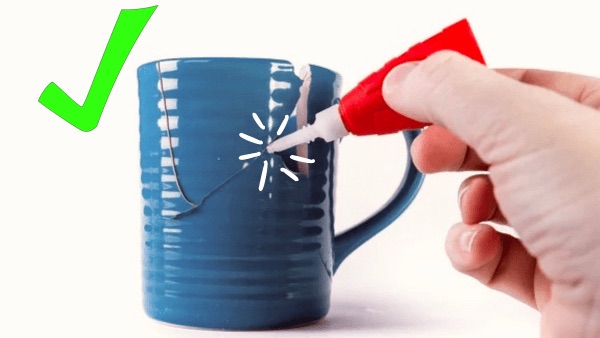
Step 2: Apply the Superglue
- Apply a small amount of superglue directly onto the area you want to bond or fill.
- If filling a crack, apply in thin layers rather than one thick blob.
Step 3: Sprinkle Baking Soda Over It
- Immediately sprinkle baking soda onto the superglue.
- The baking soda will react with the glue and begin hardening within seconds.
- Shake or blow off the excess baking soda.
Step 4: Repeat for Strength (If Needed)
For extra durability:
- Add another thin layer of superglue over the hardened surface.
- Sprinkle more baking soda and let it set.
- Repeat as needed to build layers for reinforcement.
Step 5: Sand & Paint (Optional)
Once fully hardened, you can sand it down for a smooth finish and even paint over it to match the original material.
Best Uses for the Superglue & Baking Soda Hack
This trick isn’t just for fixing broken mugs or plastic toys—it’s a DIY lifesaver in countless situations!
✔ Fixing Broken Plastic Parts
- Snapped 3D-printed objects
- Cracked phone cases
- Broken remote control covers
✔ Strengthening Weak Joints
- Loose hinges or furniture parts
- Fragile model pieces
- Weak tool handles
✔ Repairing Wood Damage
- Filling holes in wooden furniture
- Fixing splintered edges
- Strengthening loose screws (just drop glue & baking soda into the hole before inserting the screw!)
✔ Sealing Cracks in Everyday Items
- Ceramic dishes (not food-safe, but great for decorations!)
- Plastic car parts (dashboards, trim pieces)
- Torn shoe soles
Pro Tips for the Best Results
✅ Use fresh superglue. Old glue can lose effectiveness.
✅ Apply in small amounts. A little goes a long way!
✅ Wear gloves. This stuff dries instantly—you don’t want it bonding to your fingers!
✅ Use a fine-tip nozzle. This helps apply glue precisely where you need it.
What Makes This Hack So Viral?
This repair trick has been blowing up on TikTok and YouTube, with DIYers showing off insanely strong fixes that seem impossible. It’s popular because:
✔ It’s cheap. No need for expensive repair kits.
✔ It’s insanely fast. You don’t need to wait hours for glue to dry.
✔ It works on almost anything. Plastic, wood, ceramics—you name it.
Final Thoughts: Try It and Never Look Back!
Next time something breaks, don’t panic—just grab some superglue and baking soda and fix it in seconds. This hack is a must-know for DIYers, saving you time, money, and frustration.
Have you tried this trick? Let us know in the comments!
Want more DIY repair hacks like this? Check out The DIY Geek for mind-blowing tricks, tool reviews, and home improvement guides!